ASR (Automatic Speech Recognition) Research/Test

This is my first time getting into application side of artificial intelligence, I have been researching/learning about machine learning so far it was mostly related with data science and theoretical part, now I had chance to test some real stuff on real hardware and it is exciting. First of all, I tried to understand what is hugging face and when I browse through pages tabs of it I really got excited because there are a lot of stuff that is open sourced and if I have the hardware to test them I had chance to apply them according to my need and this is really powerful, and how lucky we are to live in this era, it is full of oppurtunities
Some Sources
| Description | Link |
|---|---|
| OpenAI Speech-to-Text Guide | OpenAI Docs |
| Colab Notebook | Colab Example |
| Whisper Model on Hugging Face | Whisper v3 |
| Transformers Speech-to-Text Guide | Transformers Docs |
| Transformers Installation Guide | Transformers Install |
| Vosk Speech Models | Vosk Models |
| Movie Sound Clips | Sound Clips |
Comparison of PyTorch vs. TensorFlow
| Feature/Aspect | PyTorch | TensorFlow |
|---|---|---|
| Ease of Use | Flexible, beginner-friendly | Steeper learning curve, harder for beginners |
| Community Support | Strong support from Facebook and open-source community | Active community, extensive resources |
| Integration | Seamless with Python, dynamic graph construction | Keras integration as a high-level API |
| Production Deployment | Improving with tools like TorchServe and ONNX | Strong support with tools like TensorFlow Lite, TensorFlow.js |
| Debugging | Easier due to dynamic graph construction | More abstract, higher-level API might make debugging harder |
| Ecosystem | Popular, growing rapidly | Well-established, broader ecosystem |
| Summary | Great for experimentation and Python-based robotics | Strong for production, broader toolset |
After providing you some sources that I use/d and giving some comparison about Pytorch vs TensorFlow now let’s do some local installation and some test, btw I used Jetson Orin NX 8 GB version for my tests. Up to 70 TOPS, designed for AI and edge applications with a focus on efficiency and low power consumption.
How to Use
- git clone https://github.com/yavuzCodiin/asr_vosk_test.git
- cd asr_vosk_test
- python -m venv virtual_env && virtual_env/Scripts/activate
- cd scripts
- python asr_vosk.py
Installation & Test
I had some problems with tensorflow while installing I think version problems mostly and although I used venv I still get them so I decided to use Pytorch
- First I upgraded pip with
python.exe -m pip install --upgrade pip - Then I also installed transformers with pytorch.
pip install 'transformers[torch]' -
pip install requests ffmpeg ffmpeg-python`
pip install pynput sounddevice scipy`
Transformers is an important library developed by 🤗 that provides access to pre-trained transformer models and tools, it is a tool to communication between open source libraries from 🤗
Virtual environment is the safest and clearest one for different version libraries
Virtual environment
- First of all check =>
python --version(The venv module is included with Python 3.3 and later)- If it is installed navigate to project directory =>
mkdir my_project&cd my_project - Create virtual environment =>
python -m venv <virtual environment name>
- If it is installed navigate to project directory =>
-
Activate venv with =>
.env/Scripts/activate - Deactivate venv with =>
deactivate
ffmpeg installation/configuration
The ffmpeg Python package I installed is not the same as the FFmpeg tool required for processing audio files and on windows I don’t have it .
The ffmpeg Python package I installed is not the same as the FFmpeg tool required for processing audio files. On Windows, I don’t have the FFmpeg tool installed, so I researched a little and find some sources about it
- ffmpeg installation
-
First I installed release build full and extract it under C:\ffmpeg
-
After that I added this files bin to C:\ffmpeg\bin to system variables path part save it then restarted my terminal
-
-
When I checked ffmpeg -version with this, I found that it is now installed however another issue came up which is I am working inside virtual environment .env so it is not seen and I need to do something so that .env will see ffmpeg is installed
- with this you can solve that problem =>
$env:Path += ";C:\ffmpeg\bin”
- with this you can solve that problem =>
Additional Sources
| Description | Link |
|---|---|
| NVIDIA NeMo ASR Introduction | NVIDIA NeMo ASR Guide |
| Real-Time ASR Demo Video | Vimeo ASR Demo |
| Real-Time Speech Transcription Notebook | ASR Gradio Python App |
| Google Cloud Vertex AI Speech-to-Text | Google Cloud Speech-to-Text |
| Python Curses How-To Guide | Python Curses Guide |
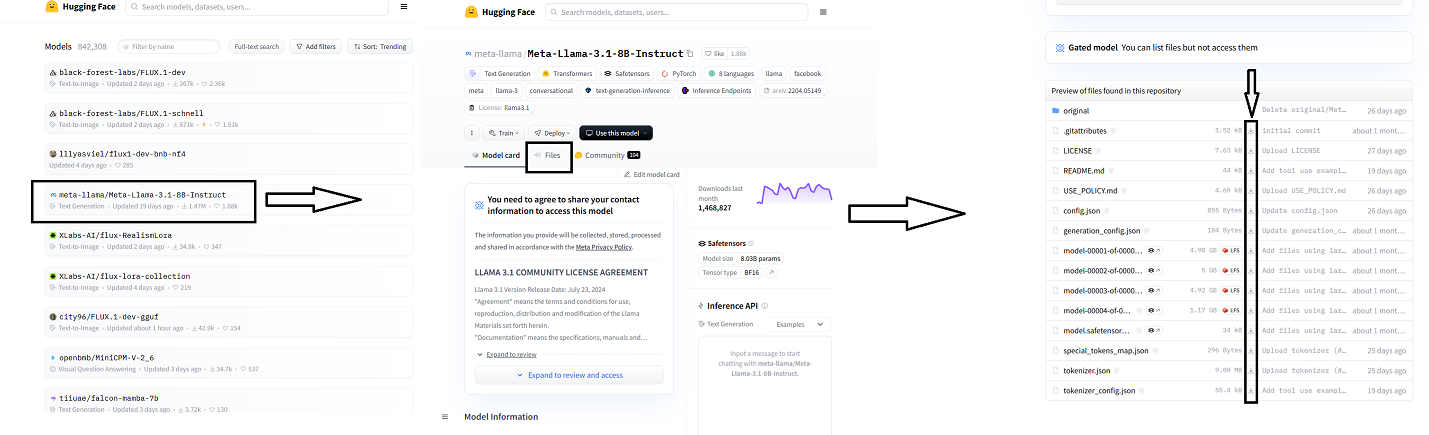
Fetch models to use offline 🤗
You can find dozens of libraries in the Open Source ecosystem in 🤗. You can download files in three ways
- By directly downloading them from model page
-
By using PreTrainedModel.from_pretrained() & PreTrainedModel.save_pretrained()
-
Download files with PreTrainedModel.from_pretrained():
   from transformers import AutoModelForCTC, AutoProcessor

   model = AutoModelForCTC.from_pretrained("facebook/wav2vec2-large-960h")
   processor = AutoProcessor.from_pretrained("facebook/wav2vec2-large-960h")
-
-
Download files by using huggingface_hub library:
- Install library
python -m pip install huggingface_hub - By using
hf_hub_downloadfunction I can download a file to specific path:from huggingface_hub import hf_hub_download hf_hub_download(repo_id="bigscience/T0_3B", filename="config.json", cache_dir="./your/path/bigscience_t0")Once the file is downloaded and stored in the local cache, specify its local path to load and utilize it accordingly.
- Install library
Testing ASR model on Nvidia Jetson Orin NX 8 Gb
First of all you need to download the ASR model from Alpha Cephei’s website. You can find the models from here
Test Script that I wrote for “vosk-model-small-en-us-0.15”
import sys
import sounddevice as sd
import queue
import vosk
import json
import curses
import textwrap
import shutil

print("Python executable:", sys.executable)

# Define the model path
model_path = "vosk-model-small-en-us-0.15"

# Initialize the Vosk model
model = vosk.Model(model_path)
q = queue.Queue()

def callback(indata, frames, time, status):
    """
    Callback function for the audio input stream.

    This function is called by the sounddevice library whenever new audio data is available.
    It places the audio data into a queue for processing.

    Parameters
    ----------
    indata : numpy.ndarray
        The recorded audio data.
    frames : int
        The number of frames of audio data.
    time : CData
        A structure containing timestamp information.
    status : sounddevice.CallbackFlags
        The status of the audio input stream.

    Returns
    -------
    None
    """
    if status:
        print(status, file=sys.stderr)
    q.put(bytes(indata))

def main(stdscr):
    """
    Main function to capture audio input, recognize speech using Vosk, and display the results in real-time.

    This function configures the audio input stream, initializes the Vosk speech recognizer,
    and updates the terminal display with recognized text.

    Parameters
    ----------
    stdscr : _curses.window
        The curses window object representing the terminal screen.

    Returns
    -------
    None
    """
    # Clear screen
    stdscr.clear()

    # Configure the audio input
    with sd.RawInputStream(samplerate=16000, blocksize=8000, dtype='int16',
                          channels=1, callback=callback):
        stdscr.addstr(0, 0, '#' * 80)
        stdscr.addstr(1, 0, 'Press Ctrl+C to stop the recording')
        stdscr.addstr(2, 0, '#' * 80)
        stdscr.refresh()

        rec = vosk.KaldiRecognizer(model, 16000)
        full_text = ""

        try:
            while True:
                data = q.get()
                if rec.AcceptWaveform(data):
                    result = rec.Result()
                    final_text = json.loads(result)['text']
                    if final_text:
                        full_text += " " + final_text.strip()
                else:
                    # Optionally handle partial results here
                    partial_result = rec.PartialResult()
                    partial_text = json.loads(partial_result)['partial']
                    if partial_text:
                        display_text = full_text + " " + partial_text
                        # Get the width of the terminal
                        width = shutil.get_terminal_size().columns
                        # Wrap the text
                        wrapped_text = textwrap.wrap(display_text.strip(), width)
                        stdscr.clear()
                        stdscr.addstr(0, 0, '#' * 80)
                        stdscr.addstr(1, 0, 'Press Ctrl+C to stop the recording')
                        stdscr.addstr(2, 0, '#' * 80)
                        for i, line in enumerate(wrapped_text):
                            stdscr.addstr(3 + i, 0, line)
                        stdscr.refresh()
        except KeyboardInterrupt:
            stdscr.addstr(3 + len(wrapped_text), 0, "\nRecording stopped by user")
            stdscr.refresh()
            stdscr.getch()

if __name__ == "__main__":
    curses.wrapper(main)
You can check the other two scripts with 2 different model(Meta Wav2vec2 & whisper_small) from my github repo under scripts folder => link
Output(vosk on jetson orin nx 8 gb)
Connect with me across the web, you can explore my digital world through the link on the image below, including more articles, projects, and personal interests.